Tuesday 20 November 2012

Look close, look twice

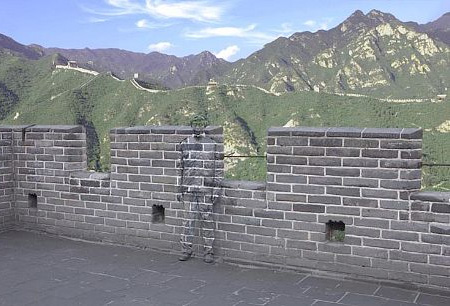
Spot it. If you dont then look close....
liu-bolin-invisible-man-2    

Great Wall

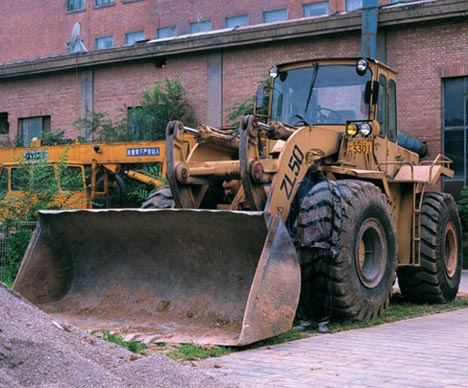
Supermarket 

So did you find him.....
Isnt this amazing. he is Chinese artist Liu Bolin also known as the invisible man.
Came to know about him form Readers Digest November issue, India edition. So just thought of blogging about him thus giving him respect and also so that I remember him and his super duper passion.
To know more about him check herehere or here

Thursday 25 October 2012

Napkin + Toothpick Combo !!!

Hello everyone....
On a table at dinner along with food other things which are necessary is a napkin and in India a toothpick. So I added these both things and TADA...
This on a table looks stylish also and is of course easy to place without the fear of the napkin flying around or tooth pick getting missed.( And it is a decoration in BUDGET.. a important thing for me)
So we can make it very easily. Things that you would need are

  • Paper napkin/ Tissue paper
  • Toothpick 
  • and your hands...

Lets start
Step 1. Fold your tissue paper in a way that it becomes a rectangle of desired shape

Step 2. Fold one end of rectangle into a triangle .

Step 4. Now fold the rectangle tail in zig zag form to form a accordion.
Step 5. Now hold the object from middle and insert toothpick in center.
Now you will get your napkin +toothpick and you can also use it to assign names to the seat. Write name on a thick paper and attach in front or any customized message can also be attached on the front side.


Monday 12 March 2012

Adding a little red

Looking at my dinning table I thought of adding a little color in the colorless area so I added a little red colour on my dinning table.


I have used a wrapping paper and made a six pointed star and simply put it under the protective plastic cover.
You can learn how to make the star from here and then simply cut the sides into any shapes to get a beautiful shape. I have round the edges as my dinning table is round in shape. you can use any type of paper or piece of cloth of any color that matches or contrasts your dinning table or walls.
Here's the Before & After.


Friday 9 March 2012

Love in a BOX

Valentine is long over and other festivals have come and gone but todays post is about a gift I gave on valentines but it is so versatile that it can be customised to suit any festival or occasion.
My inspiration is a wonderful site ohhappyday.com
You can check the above link to know exactly what we are going to make.... BOXES
If you can find those cute little boxes in shops around you, then great you can buy them(but only if they are cheap.. .... dots means buy them if they are really cheap) or else we can make them from shoe boxes, sweets boxes or form box or carton made with little thick material which can hold its shape.
Here I have used a shoe box.
Other material needed are Scissor, Glue, Paper, Decorating Paper, Pen/Pencil, Ruler.
1) On your cardboard make pattern for the box and its lid. Keep in mind as you are makin a square all sides would be equal. If length of your box is "a" then length for your lid would be "a+" where "+" is equal to thickness of your cardboard. Make a center square and then on all four sides make same length squares for the box and for the lid make a center square and the for the flaps the length has to be halved.

Cut these out.
2) Now cover these were normal white paper or any waste paper as this will not be visible.


3)After covering the base now paste flaps together with pieces of paper.
Once you have joined all the flaps your box is ready and similarly make the lid.
4)Now the next step is to cover the box with decorating paper from all sides.

Now the final step...
5)Making the accordion message card. It is very simple to make you just have to take a long strip of paper of width little less then"a"(hope you remember our"a" & "a+"). The length depends on the message you want to wrtite on it. Mine went a little long as I wanted to draw many things. you can write or message or display a story connected with the occasion. You can do anything on that strip but do not forget to fold it in accordion form and paste one end to lid and the last end to box(Be sure to leave a little flap at the top to adhere the strip to the lid of the box.). Do you see the ribbon in the corner I have used it to tie around my box.

Tie the box and then give it to your loved ones and see the expression on their faces as the message opens up. 

Tuesday 28 February 2012

Whats in the MENU

While planning for a party a very important thing is what to serve. A lot of time, energy and thinking goes in deciding the menu. It has to be according to guests and the occasion and also important thing is the availability of ingredients in the market. For me it is a very big issue because I am not good at making choices and that to for other people is a very big task for me. So if I put in so much effort in deciding the menu and then cooking those dishes then I always make a point of making a menu and also giving some different names to my dishes. This makes a very nice impact on guest and the party will also have a long stay in their memory lane as they would have put in a little effort on reading the names of dishes they are being served. Recently in a party at my home I made the following menu card.

Here the paper I have used is A4 compuetr sheets as the invitees were family members only.
You can use better quality papers and for a more beautiful presentation you can use papers that match your table cover,mine is transparent that's why I have used white.
The above menu card is very easy to make
You need...'Paper, scissor, sketch pens.
1. Choose a paper that matches your table cloth
2. Fold it in half.
3. Draw a spoon, plate and knife on the two overlapping halves so that when you open the card the figure reappears.
4. Cut the front cover as shown in second figure(Cut from middle outlining the plate and fork & spoon.)
5. You can colour your spoon,plate and fork like mine or you can also paste these utensils cutouts from papers that matches your crockery.
6. Now on the front plate you can write MENU CARD or some interesting lines that you and your family speaks before any meal or when you call someone for meal in your native language or like the ones I have used "Served fresh with love".
7. On the inner plate write your menu . All the dishes in the order they would be served. Don't forget to give new innovative names to your dishes.
What was on my MENU CARD..
Starting with....Veggies loaded hot & sour soup
                       Cheese pocket with roasted capsi dip
                        Salad roll
                        Orange Punch
                        Hongkong veggie delight
                        spinach, corn & paneer rice
                        Hot gulab jamuns with vanilla cake.
I made everyone on the table read their menu card before eating any of the dishes.. Well it was kind of fun as they having a hard time in reading these long names and then by praising for the dishes in which they again had to repeat those names.
I found it very nice during small family gatherings as everyone is connected to the whole process and also gives a personal touch.


You can use the above figures as the template to make your menu card. You can search the net for different styles of crockery on net and use the outlines the make them on your card.
Monday 27 February 2012

DIY party @ home Invitation Cards

A very good morning..
After such a long time..
Last time I posted about a invitation card that I made at home for my mom dad wedding anniversary. So it finally came out as this


I also made envelopes for these invitation cards from green wrapping paper which I have.


You can make these cards on simple A4 computer sheets for home purpose as I did as all the invitees were family members so I dint waste any money on buying cardstock papers.
You can customize the cards by changing the numbers(25 here) for the nth wedding anniversary or birthday you are celebrating. The couple can be changed to a baby boy or girl, kids or couple in traditional dresses.. that means anything according to the purpose of celebration.


Friday 13 January 2012

Invitation Cards

Hello...
I am still doing crochet project and its going on super slow pace. My mom dad are completing their 25 years this January and I am planning a special dinner for them.. I have made some invitations card and a menu card.
I am attaching a sample of the invitation card which I have made in Microsoft word and Microsoft paint as I have no knowledge of Photoshop... I know it has so many imperfections like the curve of "you are invited to " box and colors coming out of corner...
The original I have made by hand and I will put photographs once they are complete along with menu card and seat cards. Trying to make it really special for them. I and cooking 5 course meal. Lets see if my ideas
materialize successively.
If you want to use the above invitation card, you can copy the image above ( As I don't know how to attach PDFs ..Sry) and paste in Microsoft paint, remove the imperfections then save and then paste in Microsoft word and take a print. In a single A4 sheet you can have 4 invitation cards.
More to come about the party...

Friday 6 January 2012

Paper Pulp making

In my last post I told you about my crotchet project.. Its still under process an I think will take a long time.
Meanwhile I have made paper pulp at home that i would use to make many different decorating  things. So here is the tutorial for paper pulp making.
Things required

  • Waste papers
  • Bucket
  • Water
  • Mixer
  • Old Cotton Cloth
  • Sieve

Start with tearing papers into small small pieces and put them in bucket half filled with water. I did that at night and went to office the next day and after that my brother put all his waste papers into the bucket increasing the volume for my paper pulp...
After your papers are completely wet and also when you have time {It took me a week to move to this step :-)}, set your mixer grinder. Add water and paper(more water than paper) and start grinding the papers in small amounts. You would need to add little little water time by time or else the blades of mixer will just rotate and the papers would assemble at its top which means wastage of time and electricity and also the danger of your grinder getting very hot.

 When you don't see any clumps of paper or shredded paper, you can stop blending it. You now have paper pulp. Transfer the pulp in a seive and set aside. Now take a old cotton cloth and spread it over your sink. (the cloth wont be destroyed and can be used later for any purpose after wash). Put the pulp in center of the cloth and the wrap the cloth and squeeze hard to remove the water.

If you dont want to wait overnight, you can add paper bits in boling water and let it boil until the papers fell apart. You have watch this carefully and add extra water if necessary. 

So the final product looks like this. If you want to keep it for long like me then add a liitle salt and mix well. this will prevent molding.

Wednesday 4 January 2012

Happy New Year

Its the new year and a new beginning. I hope and pray that this year brings happiness and love for all and also hope that world doesn't end in 2012 as predicted....
My last post was about the lucky stars which I was to make into a new decoration. I have made those stars but really don't have time to make them into a decorating piece. This is winters in India and I am busy with my crotchet project for my bhagu. Once its over I will put photographs of it.
Till then enjoy some printable 2012 calenders
 

Get the orange, one page calender here
And get the colorful with cute dolls here
Creative Mama has some very nice printable freebies. Check them on their website.

Bye & Take Care